Creating a backyard that everyone can enjoy starts with one simple truth: walkways for wheelchairs should be smooth and durable. Whether you are designing a new garden path or updating an old one, the right walkway design makes all the difference for people who use wheelchairs, walkers, or other mobility aids. This guide explains everything you need to know about building accessible walkways that are safe, beautiful, and built to last.
Why Walkways for Wheelchairs Are Essential
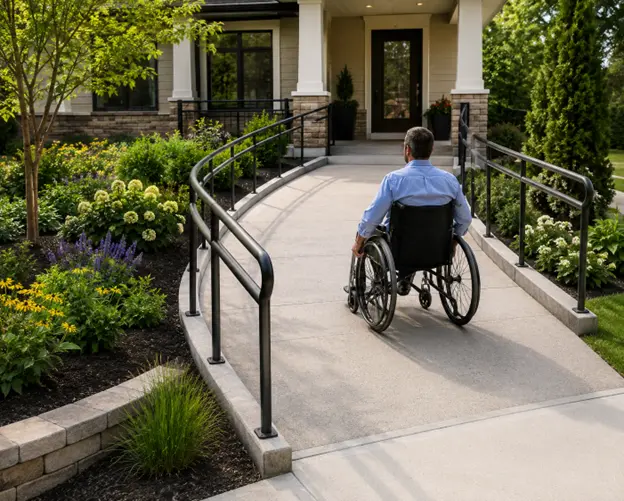
Accessible walkways are not just a nice feature—they are essential for inclusion and safety. Well-designed walkways for wheelchairs are smooth, wide, and slip-resistant, allowing wheelchair users to move freely without fear of getting stuck or falling. Good walkway design also helps older adults, parents with strollers, and anyone with temporary injuries enjoy your outdoor space.
A well-designed path turns your backyard into a welcoming sanctuary where everyone can gather, relax, and connect with nature. As one family discovered, a curving path with colorful tiles became a “storybook under their wheels” for a child using mobility aids.
Key Design Requirements for Wheelchair-Friendly Walkways
Width Matters: At Least 36–48 Inches
The ADA (Americans with Disabilities Act) requires a minimum width of 36 inches for accessible pathways. However, experts recommend 42–48 inches for comfortable wheelchair passage and easier turning.
- 36 inches: Minimum for straight sections
- 42–48 inches: Ideal for main paths
- 60-inch turning space: Needed at regular intervals for wheelchairs to turn around
When designing walkways for wheelchairs in backyard spaces, plan wider sections at intersections, near benches, or at focal points like gazebos and garden beds.
Surface Must Be Firm, Stable, and Slip-Resistant
The surface is the most critical factor for wheelchair accessibility. According to ADA regulations, accessible outdoor surfaces must be stable, firm, and slip-resistant. This means:
Requirement | What It Means |
Firm | Resists deformation when force is applied (no soft gravel or loose sand) |
Stable | Resists movement under pressure (no shifting pavers) |
Slip-resistant | Provides traction even when wet |
Avoid materials like crushed gravel, wood chips, or loose mulch, which are too soft for wheelchair wheels. Instead, choose concrete, textured pavers, asphalt, or tightly laid bricks.
Gentle Slopes: Maximum 1:12 Incline
Slopes should be gentle and gradual. The ADA recommends a maximum slope of 1:12 (1 inch of rise for every 12 inches of run). In percentage terms, keep inclines under 5% for easier navigation.
- Under 3%: Ideal for long, flat paths
- 3–5%: Acceptable with handrails
- Over 5%: Requires a ramp with handrails
If your backyard has elevation changes, install ramps instead of stairs. Avoid tight corners that make self-propelled wheelchairs difficult to maneuver.
Best Materials for Smooth Wheelchair Walkways
Choosing the right material is crucial for walkways design that lasts. Here are the top options:
1. Poured Concrete: The Smoothest Option
Poured concrete is the smoothest pathway material available. It provides a seamless surface that wheelchair wheels roll over effortlessly.
Pros:
- Extremely smooth and level
- Low maintenance
- Durable and long-lasting
- Can be finished with non-slip textures
Cons:
- Less natural appearance
- Can crack over time if not installed properly
- Not permeable (unless specially designed)
For the best results, ask for textured concrete with a broom finish or exposed aggregate to improve slip resistance while maintaining smoothness.
2. Concrete Pavers: Flexible and Durable
Concrete pavers are excellent for walkways for wheelchairs when installed correctly. The key is ensuring each paver is perfectly level with minimal gaps.
Pros:
- Modular and easy to repair
- Can follow curves and terrain changes
- Available in many colors and patterns
- Permeable options available
Cons:
- Gaps between pavers can catch small wheels if too wide
- Must be installed on a solid base to prevent shifting
Choose textured pavers with slip-resistant finishes for maximum safety.
3. Clay Bricks: Classic and Slip-Resistant
Bricks are among the best materials for accessible pathways because they are naturally textured and respond well to terrain changes.
Pros:
- Natural slip resistance from texture
- Handles topography changes well
- Classic, timeless look
- Durable and long-lasting
Cons:
- Mortar joints must be tight to prevent tripping
- Can be expensive
- Requires proper installation on a solid base
When using bricks, ensure they are laid closely together with minimal gaps to create a smooth surface similar to poured concrete.
4. Asphalt: Smooth and Budget-Friendly
Asphalt provides a smooth, stable surface similar to driveways and is often more affordable than concrete.
Pros:
- Smooth surface for easy rolling
- cost-effective
- Good for long, straight paths
- Dark color provides good contrast for visibility
Cons:
- Can soften in extreme heat
- Requires periodic sealing
- Less aesthetic appeal than pavers or bricks
5. Wood Pavers: Rustic but Requires Care
Wood pavers offer a rustic, natural look but require careful installation and maintenance.
Pros:
- Permeable (water drains through)
- Warm, natural appearance
- Can be laid closely for smooth surface
Cons:
- Slippery when wet if not sealed properly
- Requires regular maintenance
- Can rot or warp over time
If you choose wood, ensure it is properly sealed and textured for slip resistance.
Essential Safety Features for Accessible Pathways
Lighting for Visibility
Good lighting is essential for safe navigation, especially at dusk or on cloudy days. Install bright, evenly spaced fixtures along your path.
-
- Solar-powered LED lights: Eco-friendly and easy to maintain
- Photoluminescent accents: Glow-in-the-dark borders for depth perception
- Contrasting colors: Use border materials that contrast with the path surface
Handrails on Slopes
Install handrails on any slope steeper than 3% or along ramps. Handrails provide crucial support for wheelchair users and those with walkers.
Tactile Surfaces for Visual Impairment
Consider adding tactile surfaces (textured ground indicators) for visually impaired visitors. These can be subtle raised patterns that signal changes in direction or elevation.
Clear Surroundings
Keep paths free of obstacles like overhanging branches, low-hanging signs, or garden decorations that protrude into walkways for wheelchairs. Planters should not stick out more than 4 inches into the path, and must be spaced 48 inches apart.
Creative Walkways Ideas for Your Backyard
1. Curving Paths Instead of Sharp Corners
Curved paths are better than sharp corners for wheelchair users. Curves allow gradual movement between garden focal points and make self-propelled wheelchairs easier to maneuver.
Instead of a zigzag path with 90-degree turns, design gentle S-curves that flow naturally through your landscape.
2. Permeable Pavers for Eco-Friendly Design
For environmentally conscious homeowners, permeable pavers allow water to pass through, reducing runoff and pooling. This prevents water from sitting on the surface and creating slippery conditions.
One sustainable household combined permeable pavers with native grasses along the edges, blending eco-conscious design with full mobility access.
3. Embedded Art Tiles for Personal Touch
Make your path special by embedding colorful art tiles along the route. One family created a “storybook path” with tiles made by each family member, making the backyard feel playful rather than clinical.
4. Wide Sections for Gathering Spaces
Design wider walkway sections (5 feet or more) near patios, benches, or garden tables. These areas provide space for wheelchairs to turn, for caregivers to walk alongside, and for groups to gather.
5. Boundary Markers with Low Sidewalls
Install low sidewalls or borders to define the path edges and provide subtle support. Use materials that contrast with the path surface to help with depth perception, especially for those with vision challenges.
Step-by-Step Guide to Building Accessible Walkways
1. Plan Your Route
-
- Map out the path from your house to key areas (garden, patio, shed)
- Choose gentle curves over sharp corners
- Identify elevation changes that need ramps
- Mark spots for 60-inch turning spaces
2. Prepare the Base
-
- Excavate to a depth of 6–8 inches for the base
- Add 4 inches of compacted gravel or crushed stone
- Ensure proper drainage to prevent water pooling
- Level the base carefully before adding surface material
3. Install the Surface
-
- For concrete: Pour and finish with broom texture for slip resistance
- For pavers: Lay on compacted sand base, ensure each is level
- For bricks: Use tight mortar joints, keep the surface even
- Check that the surface is firm, stable, and slip-resistant
4. Add Safety Features
-
- Install handrails on slopes
- Place solar lights every 6–8 feet along the path
- Add tactile indicators at key points
- Trim vegetation to keep path clear
5. Maintain Regularly
-
- Clear snow and ice in winter
- Remove leaves in fall
- Check for cracks or uneven sections regularly
- Reseal wood or concrete as needed
Common Mistakes to Avoid
Mistake | Consequence | Solution |
Path too narrow (<36″) | Wheelchair gets stuck | Aim for 42–48″ width |
Loose gravel surface | Wheels sink in | Use concrete or pavers |
Sharp corners | Difficult to turn | Design gentle curves |
Steep slopes (>5%) | Too hard to climb | Install ramps at 1:12 slope |
No lighting | Unsafe at night | Add solar lights |
Gaps between pavers | Wheels catch | Keep gaps under ½ inch |
Inclusive Walkways Design Tips
Universal Design Principles
Design with universal access in mind from the start. This means creating paths that work for everyone—children, adults, and people with mobility aids.
Key principles:
- Smooth, level surfaces reduce trip hazards
- Adequate width accommodates all mobility devices
- Gradual slopes satisfy ADA guidelines
- Handrails provide support where terrain varies
Make It Beautiful, Not Clinical
Accessible doesn’t have to mean institutional. One family designed curving paths with colorful tiles to make their backyard feel playful, not clinical. Natural materials like textured pavers, native grasses, and strategically placed flowers create beautiful, welcoming spaces.
ADA Compliance Checklist
Ensure your walkways for wheelchairs meet these ADA requirements for outdoor accessibility:
- Width: At least 36 inches (42–48″ recommended)
- Surface: Firm, stable, slip-resistant
- Slope: Maximum 1:12 (8.33% or under 5% preferred)
- Turning space: 60-inch diameter at intervals
- Cross slope: Maximum 2%
- Obstacles: No more than 4 inches protrusion, spaced 48″ apart
- Zigzag clearance: 48 inches minimum between obstacles
Maintenance for Long-Lasting Smooth Walkways
Regular Cleaning
- Sweep or blow debris weekly
- Wash with mild soap and water monthly
- Remove moss or algae promptly to prevent slipping
Seasonal Care
- Spring: Check for winter damage, fill cracks
- Summer: Trim vegetation, check drainage
- Fall: Remove leaves before they become slippery
- Winter: Clear snow and ice immediately
Repairs
- Fix cracks in concrete within 30 days of appearing
- Replace shifted or broken pavers immediately
- Reseal wood surfaces every 2–3 years
Final Checklist Before You Start
Before building or updating your walkways for backyard, verify:
- Path is at least 36 inches wide (42–48″ ideal)
- Surface is firm, stable, and slip-resistant
- Slopes are under 5% (maximum 1:12)
- No sharp corners—use gentle curves
- Turning spaces (60″) at regular intervals
- Adequate lighting installed
- Handrails on any slope over 3%
- Path kept clear of obstacles and vegetation
Building Walkways for Wheelchairs That Last
Creating smooth and durable walkways for wheelchairs is an investment in inclusivity, safety, and enjoyment for your entire household. Whether you choose poured concrete, textured pavers, or clay bricks, the right walkways design transforms your backyard into a welcoming space where everyone can thrive.
Start with these simple walkways ideas:
- Measure your path width (aim for 42–48 inches)
- Choose a firm, slip-resistant surface
- Plan gentle curves instead of sharp corners
- Add lighting and handrails where needed
- Maintain regularly to keep the path smooth
Need Professional Help?
Don’t want to tackle this project alone? Contact the professionals at Hawkins Landscaping Inc. today to design and build your accessible walkway. Our experienced hardscape team can help ensure proper grading, drainage, safety, and long-lasting performance while creating a walkway that blends beautifully with your outdoor space.
With over 50 years of experience serving Frederick County and surrounding areas, Hawkins Landscaping Inc. specializes in custom walkways, patios, hardscapes, and landscape designs tailored to your property, accessibility needs, and budget.
Call (301) 898-3615 or visit hawkinslandscaping.com to schedule your consultation. Ask about our flexible financing options and get a custom walkway design plan built to make your outdoor space more welcoming, functional, and enjoyable for everyone.