A DIY walkway with stepping stones is one of the most rewarding ways to improve a yard without taking on a full-scale hardscaping project. It can guide guests to the front door, connect a patio to a garden, prevent worn tracks across the lawn, and add texture to an otherwise plain landscape.
The best walkway designs feel natural, stable, and easy to use. That means more than placing stones directly on grass. Proper spacing, excavation, base preparation, leveling, drainage, and material selection determine whether a stepping stone path remains attractive for years or becomes uneven after one season.
This complete guide explains how to plan and install a durable stepping stone path, choose the right walkway stones, avoid common mistakes, and turn simple walkway DIY ideas into a polished outdoor feature.
Why Build a Walkway With Stepping Stones?
A stepping stone path is more flexible and approachable than a traditional solid paver walkway. Instead of covering an entire route with pavers or concrete, you install individual stones with grass, mulch, gravel, ground cover, or decorative aggregate between them.
This creates a less formal look while still providing a clear route through the property.
A DIY stepping stone walkway can help you:
- Protect lawn areas from repeated foot traffic.
- Connect a driveway to the front entry.
- Link patios, decks, sheds, gardens, and fire pits.
- Make muddy areas easier to cross.
- Add visual interest to a flat yard.
- Define outdoor rooms.
- Create a welcoming walkway to the front door.
- Improve accessibility around frequently used areas.
- Reduce wear on planting beds.
- Add value and curb appeal to the landscape.
Stepping stones also work well in small spaces. A narrow side-yard path, garden route, or small courtyard can feel much more intentional when it includes a clear, durable walking surface. A walkway with stepping stones can also fit naturally into these smaller outdoor areas without overwhelming the space.
Plan Before You Dig
The planning stage is where successful walkway DIY ideas become practical projects. Before buying materials, walk through the yard and identify how people naturally move through the space.
For example, if family members consistently cut diagonally across the lawn from the driveway to the patio, that is likely the best location for a path. Designing around actual traffic patterns is better than forcing people to take an inconvenient route.
Consider these questions:
- Where will the path begin and end?
- Who will use it most often?
- Will people carry groceries, garden tools, or outdoor furniture along it?
- Does the route need to accommodate a wheelbarrow?
- Does the area receive standing water after rain?
- Is the ground level, sloped, or uneven?
- Will the walkway cross lawn, mulch, gravel, or planting beds?
- Do you want a formal or informal style?
- How much maintenance are you willing to do?
- Are there underground utilities, irrigation lines, or tree roots?
Sketch your route on paper before you begin. Include existing structures, trees, garden beds, utility boxes, fences, patios, and drainage areas. A basic drawing can help you estimate materials and prevent costly changes later.
For curved walkway designs, use a garden hose, rope, or marking paint to outline the path. Stand back and view it from several angles before committing to excavation.
Choose Your Walkway Style
The type of path you choose should reflect how the area is used. A walkway with stepping stones can have different styles depending on how the space is used and the look you want to create. A casual garden path can have wider gaps between stones, while a main walkway to the front door may need larger, closer-set stones for a more stable surface.
Individual Stepping Stones in Grass
This is one of the simplest and most popular designs. Individual stones sit nearly flush with the lawn so a mower can pass over them.
This style works best for:
- Informal backyard routes
- Garden paths
- Paths between patios and sheds
- Low-traffic lawn crossings
- Cottage-style landscapes
Keep stones level with the surrounding grass to reduce tripping hazards and make mowing easier.
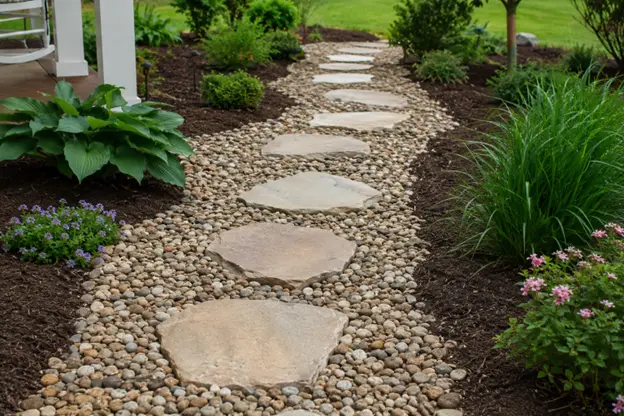
Stepping Stones With Gravel
Gravel between stones creates a more defined, low-maintenance path. It works well for contemporary, rustic, Mediterranean, and naturalistic gardens.
This design is ideal for:
- Side-yard paths
- Dry garden routes
- Patio connections
- Areas where grass struggles
- Modern landscape designs
A compacted aggregate base and edge restraint are particularly important when using gravel.
Stepping Stones With Ground Cover
Low-growing plants can soften the gaps between stones and create a lush garden-like look. Creeping thyme, sedum, certain sedges, or regionally appropriate ground covers may work, depending on sun, moisture, and foot traffic.
This option is best for low-traffic areas. Frequent footsteps can damage plants, compact soil, and create bare patches.
Formal Paver Stepping Path
Large square or rectangular concrete pavers installed in a clean grid create a modern look. They are often placed over gravel, mulch, or turf.
This is a strong choice for:
- Contemporary yards
- Straight side-yard walkways
- Pool areas
- Minimalist garden designs
- Patio-to-fire-pit connections
A formal design requires careful spacing and precise leveling. Even small inconsistencies become obvious when the stones are laid in a straight line.
Natural Flagstone Path
Flagstone offers irregular shapes and natural color variation. It can feel casual and organic, particularly when paired with native plants, boulders, mulch, or gravel.
Choose flagstone with a relatively flat surface for safe walking. Extremely uneven stones may look appealing but can be uncomfortable or hazardous underfoot.
Select the Right Walkway Stones
The best walkway stones depend on your budget, climate, intended style, and willingness to maintain them. Consider surface texture, thickness, weight, color, and slip resistance—not just appearance.
Material | Best For | Benefits | Considerations |
Concrete pavers | Modern, budget-conscious paths | Uniform size, easy layout, durable | Can look repetitive; select textured surfaces for traction |
Natural flagstone | Organic, premium garden paths | Unique colors and shapes, natural look | More expensive; requires careful fitting |
Bluestone | Formal and traditional landscapes | Dense, durable, refined appearance | Can be costly and heavy |
Slate | Sleek, contemporary paths | Dark tones and thin profile | Some types can be slippery when wet |
Concrete stepping stones | Simple DIY projects | Affordable, widely available | Quality and appearance vary |
Recycled pavers or brick | Rustic, sustainable designs | Reuses materials, adds character | Inspect for cracks and uneven thickness |
Cast-your-own concrete stones | Personalized garden paths | Custom shapes, colors, and imprints | Requires curing time and good molds |
For frequently used areas, choose stones thick enough to resist cracking and wide enough for a full, comfortable step. A tiny decorative stone may look charming but can be awkward to walk on.
Textured surfaces are generally safer than polished ones, especially near pools, sprinklers, or shaded areas where algae may form.
How Far Apart Should Stepping Stones Be?
Correct spacing is one of the most important parts of a comfortable stepping stone path. Stones that are too close can feel cramped, while stones that are too far apart force users to stretch, hop, or walk unnaturally.
A common guideline is about 24 inches from the center of one stepping stone to the center of the next. However, spacing should be tested on-site because stone size and the stride length of the people using the path matter.
Here is a practical approach:
- Lay the stones on top of the ground before digging.
- Walk the route at a natural pace.
- Adjust each stone until the stepping pattern feels comfortable.
- Ask other household members to test the route.
- Mark each final stone location with paint, flour, or a garden hose.
For many informal paths, gaps of roughly 3 to 6 inches between stone edges can work well, depending on the stone dimensions. Wider gaps may be appropriate for low-traffic garden routes, while closer spacing often feels better near an entry.
Do not rely on a single measurement alone. Test-walking the layout is the best way to ensure your walkway with stepping stones feels natural.
Tools and Materials Checklist
Gather all materials before beginning. A small stepping stone path may only need hand tools, while a longer gravel-based path can benefit from a plate compactor.
Basic Tools
- Measuring tape
- Garden hose, rope, or marking paint
- Shovel or spade
- Flat shovel
- Hand tamper
- Rubber mallet
- Level
- Rake
- Wheelbarrow
- Broom
- Utility knife
- Work gloves
- Safety glasses
- Knee pads
Materials
- Stepping stones or pavers
- Crushed gravel or compactable base material
- Leveling sand or stone dust, if needed
- Landscape fabric, optional
- Decorative gravel, mulch, soil, or ground-cover plants
- Edging, optional
- Landscape staples, if using fabric
- Jointing sand, depending on the design
Call the local utility-location service before digging, particularly for longer paths or projects near a home, driveway, irrigation system, or outdoor lighting. Never assume a shallow excavation is free of underground hazards.
Step-by-Step: How to Build a Walkway With Stepping Stones
The exact installation method depends on whether the path consists of individual stones in lawn or a fully prepared gravel walkway. The following approach creates a stable, durable result suitable for most residential projects.
Step 1: Lay Out the Route
Mark the beginning and end of the path, then lay out the stones above ground in the desired pattern.
For a straight route, use stakes and string to keep alignment accurate. For a curved path, use a hose or rope to create gentle bends. Avoid tight curves that make walking uncomfortable or create difficult mowing areas.
Walk the route several times. Check it from the front yard, patio, and windows inside the home. A path should look good from the places where you will see it most often.
Step 2: Mark Every Stone
Once you are satisfied with the layout, trace around each stone with marking paint, a shovel, or flour. Move the stones aside in the same order so you know where each one belongs.
If the stones vary in shape, label them on the underside with chalk or painter’s tape. This prevents confusion when it is time to reinstall them.
Step 3: Excavate the Base
Dig each hole slightly wider than the stone. The excavation depth should account for the stone thickness, base material, leveling layer, and the desired finished height.
For simple lawn stepping stones, you may only need a shallow excavation with compacted gravel and a leveling layer. For a heavier, higher-traffic path or one built over soft soil, a deeper compacted base is more reliable.
A commonly used paver-path method includes approximately 4 inches of compacted gravel beneath a 2-inch paver, with excavation adjusted so the finished stone is flush with nearby surfaces.
Do not guess the depth. Measure one of your stones and calculate the required layers before digging all holes.
Step 4: Compact the Subgrade
After excavating, compact the native soil at the bottom of each hole with a hand tamper. This step reduces settling and provides a more stable foundation.
If the soil is extremely soft, wet, or clay-heavy, consider excavating deeper and installing additional compacted base material. A path that repeatedly becomes uneven may have a drainage or soil problem that needs attention beyond simple stone installation.
Remove roots, loose soil, and debris as you work. Do not cut major tree roots without consulting an arborist; damaging structural roots can harm mature trees.
Step 5: Add the Gravel Base
Add crushed gravel or compactable base material to the excavated area. Use a material that locks together when compacted rather than smooth pea gravel, which shifts under weight.
For individual, lightly used stones, a thinner base may be enough. For larger pavers, gravel paths, or freeze-thaw climates, a deeper compacted base is usually worthwhile.
Add base material in shallow layers and compact each layer. This approach creates better stability than dumping all material into the hole at once.
A properly compacted base helps prevent stones from sinking, rocking, or becoming uneven after rain and seasonal soil movement.
Step 6: Add a Leveling Layer
Add a thin layer of stone dust, coarse sand, or fine gravel over the compacted base. This layer allows you to make precise height adjustments without disturbing the structural base beneath it.
Do not use thick, loose sand as the only foundation for a high-traffic path. Sand may shift over time, especially in wet conditions.
Use a trowel or hand rake to spread the leveling material evenly.
Step 7: Set the Walkway Stones
Place each stone onto the prepared base. Press it into place and tap gently with a rubber mallet.
Check every stone with a level in multiple directions. The finished surface should be stable and close to flush with the surrounding lawn, gravel, or paving. This helps keep a walkway with stepping stones comfortable and safe to use.
For paths near buildings, ensure water does not drain toward the foundation. A subtle slope away from the home helps guide runoff safely away.
Each stone should sit firmly without rocking. If it moves, remove it, adjust the base material, compact again, and reset it. Do not try to fix a wobbly stone by piling loose soil around the edges.
Step 8: Check Spacing and Alignment Again
Once several stones are set, walk the path again. Verify that the stride feels natural and that the route does not shift awkwardly at curves or transitions.
A visually perfect layout is not always the most comfortable to walk on. Prioritize safe, natural movement over rigid spacing rules.
If you are installing square pavers in a modern grid, use a straightedge or string line to confirm clean alignment.
Step 9: Fill the Gaps
Choose a filler material that suits the style and maintenance needs of the path.
Grass: Creates a seamless lawn appearance but needs trimming and may wear out in high-traffic areas.
Gravel: Offers drainage and low maintenance but needs edging and periodic replenishment.
Mulch: Works in woodland and garden paths but decomposes and requires regular top-ups.
Ground cover: Softens the design but is best for light traffic.
Polymeric or jointing sand: Useful for tightly spaced pavers, depending on the manufacturer’s instructions and overall installation method.
For gravel-filled designs, landscape fabric can help separate gravel from soil and suppress weeds, although it does not eliminate maintenance completely. Install it flat and secure it with landscape staples before adding aggregate.
Step 10: Finish the Edges
For stepping stones set in lawn, you may only need to backfill soil around each stone and reseed damaged turf.
For gravel paths, edge restraint is more important. Metal, plastic, stone, brick, or paver edging can keep gravel from spreading into planting beds and lawn areas.
Sweep the stones clean and remove excess gravel, sand, or soil from the walking surface. Loose material on smooth stones can create a slipping hazard.
Walkway Designs to Inspire Your Project
A basic path can become a major design feature with the right materials and planting.
Modern Grid Walkway
Use large square concrete pavers set in a clean, evenly spaced pattern. Fill gaps with dark gravel, low ground cover, or turf.
This style works well with modern architecture, minimalist planting, black metal accents, and rectangular patios.
Cottage Garden Path
Choose irregular flagstone walkway stones surrounded by flowering perennials, low herbs, and soft ground covers. Allow plants to spill slightly toward the edges—but not so much that they obscure the path.
This design works beautifully with lavender, catmint, sedum, thyme, salvia, and ornamental grasses.
Gravel-and-Stone Side Yard
Transform an underused side yard with large rectangular stepping stones over compacted gravel. Add narrow planting beds, wall-mounted lighting, and a few shade-tolerant plants if the area receives limited sun.
This is one of the most practical walkway DIY ideas for solving muddy, difficult side-yard access.
Front Entry Stepping Path
Create a welcoming walkway to the front door with large, evenly spaced pavers set in lawn or gravel. Use symmetrical containers or repeated border plants to frame the route.
For a more formal appearance, use rectangular bluestone or concrete pavers aligned with the home’s entry axis.
Woodland Stepping Stone Path
Use natural stone, mulch, and shade-tolerant plants to build a relaxed route through a wooded area. Curved lines usually look more natural than rigid straight paths in this setting.
Avoid excessive excavation near mature tree roots. Use a path layout that works around existing trees rather than forcing a straight route through them.
Drainage and Safety Considerations
A good path must manage water as well as foot traffic. Standing water can cause stones to settle, encourage algae growth, and create slippery conditions.
To improve drainage:
- Avoid placing stones in a low spot without addressing water flow.
- Use a compacted crushed-stone base.
- Slope the path gently away from structures.
- Use gravel or permeable materials between stones.
- Keep gutters and downspouts from discharging directly onto the path.
- Maintain nearby grading and drainage swales.
- Clean leaves and organic debris from the stone surface.
Choose textured, slip-resistant walkway stones for shaded, wet, or poolside areas. If your property experiences ice and snow, keep the path clear in winter and avoid deicing products that may damage natural stone, concrete, nearby plants, or soil.
For a main route used by children, older adults, or people with mobility concerns, consider a continuous paved walkway rather than widely spaced individual stones. Stepping stone paths are beautiful, but they do not provide the same accessibility as a full, stable walking surface.
Common DIY Mistakes to Avoid
Many stepping stone projects fail because the stones are installed too quickly without preparation. Avoid these mistakes:
- Placing stones directly on grass or loose soil.
- Skipping the compacted base.
- Failing to test the stride before digging.
- Installing stones above the lawn surface.
- Using smooth stones in wet, shaded areas.
- Ignoring drainage patterns.
- Choosing stones that are too small for comfortable footing.
- Failing to check stones for rocking.
- Using pea gravel as a structural base.
- Allowing plants to overgrow the route.
- Forgetting to call before digging.
- Installing a path too close to a building without proper drainage.
The most important lesson is simple: a stable base matters more than decorative surface material. Even beautiful natural stone will become a frustration if it rocks, sinks, or collects water.
Seasonal Maintenance for a Stepping Stone Path
A properly installed path needs relatively little maintenance, but a few seasonal checks can extend its life.
Spring
Inspect for frost heave, shifting, cracks, and sunken stones. Remove weeds, clean debris, and reset any stone that has become uneven.
Summer
Trim grass and ground covers away from the path edge. Replenish mulch or gravel as needed and keep the surface clean.
Fall
Remove leaves promptly, especially in shaded areas where wet debris can become slippery. Check drainage before heavy seasonal rain.
Winter
Use caution with ice-melt products. Follow the manufacturer’s guidance for your specific stone type and consider sand for traction where appropriate.
DIY Cost Factors
The cost of a stepping stone walkway depends on stone material, path length, base depth, soil conditions, and whether you own or rent equipment.
Your budget may include:
- Walkway stones or pavers
- Crushed gravel
- Leveling sand or stone dust
- Landscape fabric
- Edging
- Decorative gravel or mulch
- Delivery fees
- Tool rental
- Plants or lighting
- Disposal of excavated soil
Concrete stepping stones are generally among the most budget-friendly options. Natural flagstone, bluestone, and premium porcelain pavers typically cost more but may deliver a higher-end appearance.
Save money by keeping the layout simple, using locally available materials, completing excavation yourself, and avoiding unnecessary cutting. However, do not reduce the base depth or skip compaction just to lower costs—repairing a settled walkway later is usually more expensive.
When to Hire a Professional
A DIY stepping stone path is realistic for many homeowners, especially when it is short, level, and located away from structures. However, some projects need professional help.
Contact a landscape contractor or hardscape installer if you have:
- Significant slopes
- Persistent drainage problems
- A path near a foundation
- Heavy clay or unstable soil
- Major tree roots
- A large or complex patio connection
- Accessibility requirements
- Extensive excavation needs
- Retaining walls or steps
- Electrical or irrigation work
A professional can help create walkway designs that integrate grading, drainage, lighting, planting, patios, and other landscape features into one cohesive plan. They can also help determine whether a walkway with stepping stones is the right choice for your property.
Create a Walkway With Stepping Stones You’ll Enjoy Every Day
A DIY stepping stone walkway can make an ordinary yard more functional, welcoming, and memorable. With the right walkway stones, stable base preparation, comfortable spacing, and a layout that follows how people naturally move, your path can look professionally designed without requiring a full hardscape renovation.
Ready to get started? Measure your route, test your stone spacing, choose materials that complement your home’s style and local climate, and begin with a manageable section of your yard. Careful planning today will help you create a walkway with stepping stones that’s attractive, durable, and built to last.
If you need help with grading, drainage, custom walkway designs, or a complete outdoor living project, trust the experts at Hawkins Landscaping Inc. With over 50 years of experience serving Frederick County and surrounding areas, our team specializes in custom walkways, patios, retaining walls, hardscapes, drainage solutions, and complete landscape design tailored to your property, lifestyle, and budget.
Call (301) 898-3615 or visit hawkinslandscaping.com to schedule today. Ask about our flexible financing options and let us help you create a beautiful, functional walkway that connects your outdoor spaces while adding lasting beauty and value to your home.