Garden bed edging serves both practical and aesthetic purposes. It helps define the boundaries of your garden, keeps mulch and soil in place, and adds a polished look to your landscape. With various materials and styles available, choosing the right edging for your garden beds can be overwhelming. This guide will help you understand the different options and considerations to make an informed decision.
Garden edging is a crucial element in landscape design. It makes your garden look better and also helps stop soil from washing away and keeps weeds out. The right edging can complement your garden style and meet your practical needs.
The Significance of Garden Bed Edging
Garden beds are the main parts of a garden project, and good edging can make them look nicer and show where they start and end. Proper edging not only offers a polished finish but also helps prevent grass and weeds from invading your garden beds. In this detailed guide, we will walk you through the professional techniques for edging your garden beds.
Why Edging Garden Beds Matters
Garden beds are important for your garden design, and good edging can make them look better and show their edges clearly. Edging provides a clean, finished look while also keeping grass and weeds from intruding into your garden beds. This comprehensive guide will cover the essential steps to edge your garden beds like an expert.
Why Proper Edging is Crucial for Garden Beds
Garden beds are often the main part of a garden project, and good edging can make them look better and show where they start and end. Edging not only improves the overall look but also prevents grass and weeds from spreading into your garden beds. In this thorough guide, we will explore professional techniques for achieving perfect garden bed edges.
The Benefits of Edging Garden Beds
As focal points of your landscaping efforts, garden beds benefit greatly from proper edging. Effective edging not only improves the visual appeal of your garden beds but also helps to keep grass and weeds at bay. This guide will provide you with professional tips and techniques for edging your garden beds to perfection.
The Role of Edging in Enhancing Garden Beds
Garden beds play a central role in landscaping design, and the right edging can enhance their beauty and define their edges. Proper edging contributes to a polished look and prevents unwanted grass and weeds from invading your garden beds. This comprehensive guide will teach you the professional methods for achieving beautifully edged garden beds.
Enhancing Your Garden Beds with Effective Edging
Garden beds are often the best part of your garden design, and good edging can make them look nicer and show their borders clearly. Proper edging not only provides a neat, finished look but also helps keep grass and weeds from intruding into your garden beds. In this detailed guide, we will show you how to edge your garden beds like a professional.
The Benefits of Professional Garden Bed Edging
Garden beds are a main part of any garden project, and good edging can make them look better and show clear boundaries. Edging adds a refined look and prevents grass and weeds from encroaching on your garden beds. This guide will walk you through professional techniques for perfecting your garden bed edges.
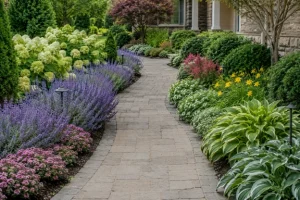
Types of Garden Edging Materials
Natural Stone
Pros:
- Durable and long-lasting.
- Offers a natural, timeless look.
- Variety of colors and textures.
Cons:
- Can be expensive.
- Heavy and challenging to install.
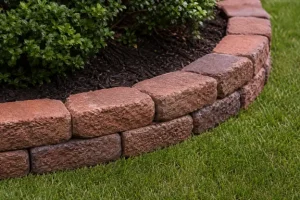
Brick
Pros:
- Classic and versatile appearance.
- Durable and weather-resistant.
- Easy to install with various patterns.
Cons:
- Can be costly.
- Requires maintenance to prevent weed growth between bricks.
Metal
Pros:
- Sleek and modern look.
- Extremely durable and long-lasting.
- Flexible for curved garden beds.
Cons:
- Can be prone to rust (except aluminum or galvanized steel).
- More expensive than plastic or wood.
Plastic
Pros:
- Affordable and easy to install.
- Available in various styles and colors.
- Low maintenance.
Cons:
- Less durable than metal or stone.
- Can look less natural.
Wood
Pros:
- Natural and warm appearance.
- Versatile with different styles and finishes.
- Relatively easy to install.
Cons:
- Susceptible to rot and insect damage.
- Requires regular maintenance and treatment.
Concrete
Pros:
- Very durable and long-lasting.
- Can be molded into various shapes and styles.
- Resistant to weather and pests.
Cons:
- Heavy and challenging to install.
- Can crack over time if not properly installed.
Choosing the Right Edging for Your Garden
Consider Your Garden Style
Formal Gardens:
- Opt for clean, straight lines and structured materials like brick or metal.
Cottage Gardens:
- Natural stone or wood complements the rustic, informal style.
Modern Gardens:
- Sleek materials like metal or concrete work well with contemporary designs.
Assess Durability and Maintenance
Durability:
- Choose materials that can withstand your local climate and garden conditions.
Maintenance:
- Consider how much time and effort you are willing to invest in maintaining the edging.
Budget
Cost Considerations:
- Natural stone and metal can be expensive but offer long-term value.
- Plastic and wood are more budget-friendly but may require replacement sooner.
Installation
DIY vs. Professional:
- Some materials like plastic and wood are easy to install yourself.
- Others, like natural stone or concrete, may require professional installation.
Functionality
Soil and Mulch Retention:
- Ensure the edging is tall enough to keep soil and mulch in place.
Weed Barrier:
- Some edgings, like brick and concrete, provide better weed control.
Environmental Impact
Sustainability:
- Opt for eco-friendly materials like sustainably sourced wood or recycled plastic.
Local Availability:
- Using locally sourced materials reduces transportation costs and environmental impact.
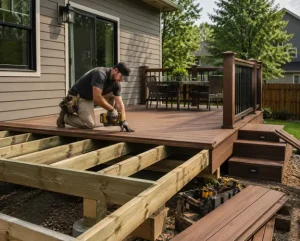
Installation Tips
Preparing the Site
Steps:
- Outline the garden bed using a garden hose or string.
- Dig a trench along the outline, making sure it’s deep enough to secure the edging material.
Installing the Edging
General Tips:
- Follow manufacturer instructions for specific materials.
- Ensure the edging is level and properly anchored to prevent shifting.
Finishing Touches
Backfilling:
- Backfill the trench with soil to secure the edging in place.
- Tamp down the soil to eliminate air pockets.
- Add mulch to enhance the appearance and functionality of the edging
Maintenance Tips
Regular Inspections
What to Check:
- Look for signs of damage or shifting.
- Check for weed growth around the edging.
Cleaning
How to Clean:
- Remove debris and dirt buildup regularly.
- Use appropriate cleaning methods for the material (e.g., mild soap for plastic, pressure washing for stone).
Repairs
Common Repairs:
- Replace damaged sections promptly.
- Re-anchor loose edging to maintain stability.
Conclusion
Choosing the right edging for your garden beds involves considering various factors, including style, durability, budget, and functionality. By learning about different materials and their pros and cons, you can pick the best ones for your garden’s health and looks. Proper installation and maintenance will ensure your garden edging remains attractive and effective for years to come.